Ship Battle Guide: Difference between revisions
mNo edit summary |
|||
| (14 intermediate revisions by the same user not shown) | |||
| Line 1: | Line 1: | ||
=Overview= | ==Overview== | ||
This guide helps players understand how to build fleets, choose weapons, and win in Ship Battles in [[Outlaw Troopers]]. | |||
Players command a fleet of [[Ships]] in 1v1 auto-chess style combat. The goal is to build the right fleet, position them wisely, and use their abilities effectively to outsmart enemies. | |||
= | ==Ship Battles== | ||
To access, go to Explore → Ship Battle. | |||
- [[Seasonal Ship Battles]] | |||
- [[Defeat the Horde]] | |||
- [[Expedition]] | |||
==Choosing Weapons== | ==Choosing Weapons== | ||
<html><img src='https://play.outlawtroopers.io/images/ccguide1.png'/></html> | <html><img src='https://play.outlawtroopers.io/images/ccguide1.png'/></html> | ||
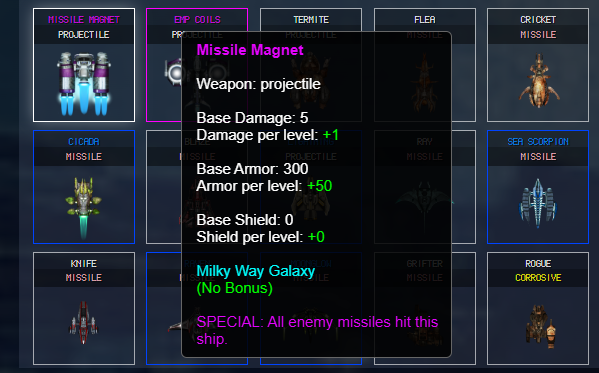
There are three types of weapons: | There are three types of weapons: | ||
- Projectile: Hits shields first, then armor. | |||
- Missile: Skips shields and hits armor directly. Useful for fast armor damage. | |||
- Corrosive: Deals less damage to shields but more to armor. Best used after shields are down. | |||
==Building Your Fleet== | ==Building Your Fleet== | ||
<html><img src='https://play.outlawtroopers.io/images/ccguide2.png'/></html> | |||
- Each battle requires 6 [[Ships]] to start. Most [[Ships]] take up 1 slot, but [[Ships]] from the Titan Galaxy take up 2 slots. | |||
- [[Ships]] can be stacked to level up in [[Seasonal Ship Battles]]. | |||
- Mix different weapon types and rarities to find your best combination. | |||
Epic and | - Epic, legendary and limited [[Ships]] have unique abilities that add a new layer of strategy. Some may have less armor or shield but compensate with powerful abilities. | ||
<html><img src='https://play.outlawtroopers.io/images/ccguide3.png'/></html> | <html><img src='https://play.outlawtroopers.io/images/ccguide3.png'/></html> | ||
== | ==Basic Strategies== | ||
- All-Missile Strategy: Use a fleet full of Missile [[Ships]] for straightforward armor-piercing damage. | |||
- Mixed fleet with Projectile and Corrosive: Balanced setup. Try 4 Projectile and 2 Corrosive, or a 3/3 split. Place Projectile [[Ships]] first to break shields, followed by Corrosive [[Ships]] to finish armor. | |||
- Positioning: [[Ships]] attack from left to right. Place your strongest attackers on the left so they attack first. | |||
==Tips for Other Modes== | |||
===Defeat the Horde Mode=== | |||
- Use healing [[Ships]] like Bulwark or Shield Battery to survive longer. They provide healing to armor and shields at the start of each wave, helping you last longer. | |||
- Use instant-kill abilities like Nullify or Hyperlance [[Ship]] to destroy tough enemies. Nullify instantly removes the leftmost enemy [[Ship]] before battle. Its cost is incremental so it's better to save it for boss waves. | |||
===Expedition Mode=== | |||
- Sneak mode: Avoid enemies and survive longer. | |||
- Aggressive Mode: Increases the chance of encountering enemies and bandits to collect [[Ship Components]] | |||
==Master Ship List== | |||
For a detailed list of all available [[Ships]], including their rarity, weapon type, stats and abilities, see the [[Master Ship List]] page. | |||
==Summary== | |||
Build balanced fleets, understand weapon types, and use smart positioning. Experiment with different [[Ships]] to find your winning strategy. | |||
Latest revision as of 12:53, 29 October 2025
Overview
This guide helps players understand how to build fleets, choose weapons, and win in Ship Battles in Outlaw Troopers.
Players command a fleet of Ships in 1v1 auto-chess style combat. The goal is to build the right fleet, position them wisely, and use their abilities effectively to outsmart enemies.
Ship Battles
To access, go to Explore → Ship Battle.
Choosing Weapons

There are three types of weapons:
- Projectile: Hits shields first, then armor.
- Missile: Skips shields and hits armor directly. Useful for fast armor damage.
- Corrosive: Deals less damage to shields but more to armor. Best used after shields are down.
Building Your Fleet

- Each battle requires 6 Ships to start. Most Ships take up 1 slot, but Ships from the Titan Galaxy take up 2 slots.
- Ships can be stacked to level up in Seasonal Ship Battles.
- Mix different weapon types and rarities to find your best combination.
- Epic, legendary and limited Ships have unique abilities that add a new layer of strategy. Some may have less armor or shield but compensate with powerful abilities.

Basic Strategies
- All-Missile Strategy: Use a fleet full of Missile Ships for straightforward armor-piercing damage.
- Mixed fleet with Projectile and Corrosive: Balanced setup. Try 4 Projectile and 2 Corrosive, or a 3/3 split. Place Projectile Ships first to break shields, followed by Corrosive Ships to finish armor.
- Positioning: Ships attack from left to right. Place your strongest attackers on the left so they attack first.
Tips for Other Modes
Defeat the Horde Mode
- Use healing Ships like Bulwark or Shield Battery to survive longer. They provide healing to armor and shields at the start of each wave, helping you last longer.
- Use instant-kill abilities like Nullify or Hyperlance Ship to destroy tough enemies. Nullify instantly removes the leftmost enemy Ship before battle. Its cost is incremental so it's better to save it for boss waves.
Expedition Mode
- Sneak mode: Avoid enemies and survive longer.
- Aggressive Mode: Increases the chance of encountering enemies and bandits to collect Ship Components
Master Ship List
For a detailed list of all available Ships, including their rarity, weapon type, stats and abilities, see the Master Ship List page.
Summary
Build balanced fleets, understand weapon types, and use smart positioning. Experiment with different Ships to find your winning strategy.